Showing posts with label renovation. Show all posts

Saturday, July 23, 2011

so retro

Justin and I have been super busy working on the house here lately. We've painted the exterior (mostly), worked on our garden, installed a dishwasher, a washer, and a drier, cleaned and rearranged things, and done a few small projects. I've got to show you one that we are both loving.

Remember all my wonderful finds from the New Athens town wide yardsale? Well, I got that amazing little record player, and I was trying to decide between fixing the record player and gutting it... we went with gutting it. Here's what we did :)
 This is the infamous before shot :)
 This is my wonderful husband getting those pesky screws out.
And this is the interior... Our Ipod and a little radio. We love it! It has a cool distortion from being in a box. We had a graduation party for Justin a few weeks ago, and everyone was like, "where's the music coming from... omg, is it coming from the record player? that's awesome." We are pretty proud of ourselves.


Now, the project that is driving my nuts at the moment is getting this last little bit of our kitchen done. When we moved in we had no appliances and a weird little desk thing in this spot. We tore out the little desk thing pretty early on because it served no purpose besides annoying me by taking up needed space.
I bought our dishwasher for $35 a few weeks ago. (Score!) My MIL's boyfriend Jim and Justin hooked it up, and it works great. TODAY, I bought this base cabinet from the St. Louis Habitat for Humanity Restore. I expected to pay around $20 for a base cabinet. I could not believe my eyes when I saw that the tag said $1! ONE DOLLAR PEOPLE! That made my day for sure.
 Now, it's door and handle do not match our cabinets, but I am working on that. I'm also working on getting a piece of counter top as close as possible to our existing counter top. Usually Home Depot comes through for me, but it looks like I'm going to have to go to a custom cabinets and counter tops place. This doesn't hurt my feelings too much since I got the cabinet for a dollar. SERIOUSLY A DOLLAR!
Since the cabinets were only a dollar, I also picked up this long skinny one. I've got some big ideas for it, but we will have to see. I'm thinking about hanging it horizontally  in my awkward little nook thing. Also, I think I want to put one of those lift up hydrolic frosted glass doors on it. I might use it to store my tea in. (I am already taking up a whole cabinet of just tea.)


I also went to the Goodwill outlet store. It's a giant Goodwill with bins that you have to sift through and everything in the bins is .79 a pound, books are .39 a pound, and none of the furniture or appliances is over $15. It was amazing! I got a bunch of cool stuff that I really want to show you, but I will have to save it for later. My poor pooch is very sleepy... and I am pretty tired too... sorting through all those bins tuckered me out, lol.
Good-night :)

Saturday, July 10, 2010

$38 saved and I didn't hurt the environment!

My mama and I have been itching to check out our local Habitat for Humanity Restore, so today we went. I found the exact sconces I've been ooo-ing and ahhhh-ing for my bathroom. (new from store)They are technically outdoor lights, but I love the vintage look they have. I have a 1920's boat house thing going on in my bathroom (you know minus the finished tile and walls and floors... so I have the accessories) The best part was the price. I picked these bad boys up at a dollar a piece! They are $20 new, so I saved $38. Oh yeah, I'm good!
Here they are with my mermaid soap dish, who is 1920's reproduction cast iron. (The soap is Chamomile scented olive oil soap I bought in a Greek community in Florida... best soap ever!)Here are my seahorse hooks, which my loving husband hung up for me a week or so ago. As you can see they will get a lot of use!

This is the "classy" tube lighting my fabulous new sconces will be replacing eventually. (The sconces aren't actually new... I think they were outside before because they are a little weathered, but all the better for it. I couldn't have given them such a natural patina if I tried!)

Also, I had mentioned we have the roof redone. They did an awesome job. Greg even came by on the 4th of July because our tar paper was coming up a bit, and he was worried it would rain. I was really suprised by his dedication. The roof is beautiful. This picture does no do it justice.

...but such it is with cell phone pictures... They put in a ridge vent as well, which is already keeping the house cooler. The a.c. is running about half as much (YAY!)

However, I really do not like the gray I was painting the house with the new tan roof. I am thinking of painting a color like yellow or blue. Any thoughts? Maybe a light buttery yellow with a blue door? *ponders*

And also, I told you Justin was going to start laying the floor we ordered... Here's what it looks like after one day of work.
He pulled up what he did before and put an under-lament down. I can't wait to have one continuous floor!!! It is going to be so beautiful when it's done, and it shouldn't take him much longer. Also it will be wonderful to set up our living and dining rooms and actually be able to use them :) It makes me giddy! I want to get to the fun part already.

That's what we have going on right now... it's kind of a lot all at once, but it's going to be so worth it. I can see the big picture, and our house is gonna be amazing! Hope you enjoyed my thrifty score. Check out your local Restore! You never know what you might find :)

Wednesday, June 30, 2010

Scary, scary bathroom

As we are getting more projects done, we approach the scariest of them all... my bathroom...

It is a total mess! We pulled the tile, wallpaper, and the mirror down. And now it's a disgusting war zone. My sweet, sweet husband cleaned the bath tub for me, so I can still take a bubble bath every now and then... but this atmosphere doesn't exactly de-stress.

We still need to
  1. Do the roof and guttering. (Which should be started as early as tomorrow, yay!)
  2. Finish the laminate flooring (We ordered the rest of the materials, which we will have by Tuesday! also yay!)
  3. Replace our oil burning furnace with an electric furnace. (Oil, as in what you put in your car... it costs like $500 a MONTH to keep the thing running when it's really cold out. No way Jose!)
  4. I need to paint the exterior of our house... bring on the skimpy cloths and half-***ed tanning opportunity, lol.
  5. um, I'm sure I'm forgetting something
  6. and probably something else...
all before we can start on my bathroom. :( I really want a nice bathroom again!

BUT! It could be worse! I could be stuck with THIS...
Thank you Better After and Laura of Studio Orange for some much needed perspective! (Follow the link to see Laura's inspiring "after")

Thursday, June 3, 2010

My pretty new floor!


This morning, I woke up and walked barefooted onto my brand new kitchen floor. The hubs and I have been working very hard on the floor for the last week, and I'm happy to report I have finished photos!

Here is Justin laying the last bit of flooring down... and...Here she is!!! This is while the sealant was still a bit shiny. It's a light gray commercial tile. We chose it because it's
  • pretty cheap
  • easy to install
  • looks nice
  • easy to maintain and clean
  • and because it is going to wrap down our basement steps and into the basement
The only things left to do in the kitchen are
  • put up baseboard trim
  • paint the tiles (good-bye yellow!)
  • paint the accent wall
  • replace the stupid desk thing with a stock cabinet with dish washer housing
  • make built-in for accent wall
  • hang some art
Seems like a lot, but the floor was a major milestone that we are glad to have finished!

Sunday, May 2, 2010

epic fail


So, I worked on my cabinets all weekend, and they are done! Why is this post titled "epic fail" then? Because I forgot to take my camera! This photo was shot with my camera phone, but I couldn't get any good pictures of the whole cabinets... so we will just call this a teaser, lol.

If I have learned anything doing this project it would be this: I HATE CONTACT PAPER!!!

If you haven't ever used it, it is a pain in the butt. It is sticky and hard to control... (That's what she said.) In fact, it is a veritable onslaught of "that's what she said jokes waiting to happen... ugh! Never again! I never would have used it, but the choice was made for me by the former homeowner. She had used contact paper, and we pulled it up. Nothing was taking that glue off though, so I had to put some back over it.

I will admit though, this dotted contact paper I got at Target was really cute, and even though I was very frustrated by the installation process, I do at least think it looks cute... that's enough.

So, finished product pictures soon :) or at least soonish, lol.

Sunday, April 18, 2010

The Kitchen

The Kitchen:
I've been working hard on the kitchen cabinets for almost a month. They started out as icky laminate stock cabinets...

But then we took all the doors and hardware down, and sanded the heck out of everything. Two coats of primer later and the kitchen already seemed brighter and happier :)


Today I put the first coat of paint on the fronts of all the doors. Everything else has two coats. MIL came over and primed the insides of my cabinets, which I'm really grateful for... it looks MUCH better that way! I might paint the insides blue or yellow... I think a pop of color inside would be nice.


This is my basement workspace. Yeah, it's dreary... but it was too cold and wet when I started to paint outside.

There will be pictures soon of the new color. It's called "Alpaca" and it's a tanish creme color.

In the works
  • paint the insides of the cabinets
  • put the cabinets back together
  • find some contact paper I can live with (I HATE contact paper but the former owner had it, and the shelves are all nasty and sticky, and I can't get them clean... I feel I have no choice... unless someone has an idea!? I'm open to ideas!)
  • sand, prime, and paint the yellow and black tiles
  • paint the accent wall
  • lay down the tiles for the floor
  • find inexpensive pulls and cups (or spray paint the old ones)
  • make a cafe curtain
  • make recycling bin
  • and a thousand other things, lol

Friday, April 9, 2010

our house is a very, very, very fine house :)


My DH and I just recently, last July, purchased our first home (yay!), and we are going to be doing a lot of work on it. Two of my favorite websites are Design Sponge and Apartment Therapy. Over the past few years living in our itty bitty one bedroom apartment, I have been stock piling inspirational pictures from all kinds of design websites to one day use on a house... and that time has finally come! I've started this blog to keep track of all the designing, demo-ing, renovating, blood, sweat, and tears that go into our first place. BUT FIRST, let me post some before pictures!
Living room
Notes: 1) My mother-in-law, who is an angel, bought me paint as a house-warming gift and then spent all weekend helping me paint the living room, dining room, and hallway (which all connect). We used a light green called "Northern Pear Tree". 2) Can you say "hello, natural light!" There are TONS of windows, and they are all huge! Custom draperies are on my projects list. 3) the fireplace... it's HUGE! It runs the entire length of the wall. My DH loves it... I will love it once it's got some fabulous built-ins on top :) We used it a lot this winter, and it is fantastic! 4) That was some of the smelliest shag carpet on the planet... it was the first thing to go! because...

There were gorgeous wood floors underneath! This house was built in the 50's and they added on an addition in the 70's. Only one family lived in it prior to us. (The husband designed and built it for his wife, adorable!) The wife loved carpet... it was everywhere... even in the bathroom!
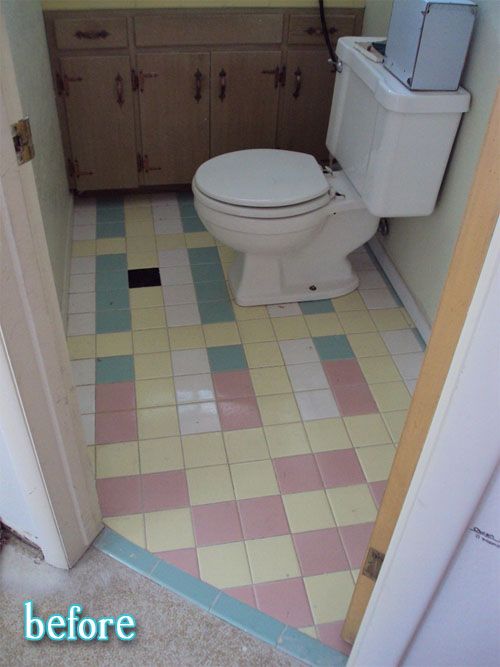

UGH! The bathroom!
Notes: 1) See the carpet? Who puts carpet in a bathroom! I think it took my longer to tear this out, than it took to tear out the carpet in the living room, dining room, and hallway because it was really hard to get behind the toilet. 2) It might be hard to see much because of the GIANT 70's vanity cabinet. It's like 5' long, has sliding doors (that stick), and a boomerang diner style top (Which I kinda dig) The only thing I'll be sad about when this goes, is I will loose my little green sink... I like it... 3) Green sink, green toilet, nice big green soaking tub... adorable older home charm :) which I lurve! They aren't even a bad color of green... it's like a minty color, so basically precious! 4) the tile... it was (because I tore it out already) plastic tile in a green that didn't really 
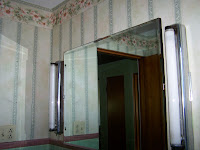
match the toilet and a weird dusty pink color. Not my thing. 4) wall paper- not my thing, has been removed. 5) crazy fluorescent tube (sconces?) also not my thing... Haven't removed them yet. 6) The mirror- was big, which is a plus, but it wasn't framed out, and it wasn't a medicine cabinet mirror... not pretty or functional.
*I have sooo much planned for this bathroom! It's got a lot of potential, and I can see what it will be... and we just got our refund check, so I may get to work on it soon :)

The Dining Room
Notes: 1) I bought a fabulous 1940's Dinette set from Wisconsin Chair Company off craigslist (oh how I love thee!) The chair in this picture is one of the captain's chairs from the set. They have a windsor blue vinyl on them. I love them! 2) This room had a NASTY surprise for us!!! Everything from the light fixture back was the addition. (They put on the dining room, a sun room, and a garage.) I've already shared the previous homeowners' affintity for carpet... well, the did not extend the hardwood floors into the dining room addition. When we pulled up the carpet we found half hardwood, half plywood... :( but Justin (my dh) is laying down some click and lock laminate over it, and then we are going to re-stain the rest of the floors to match. It's a big project, but I think we can make it look nice :) and by we I mean he... naturally...


The Kitchen
Notes: 1) I loves me a galley kitchen! (The appliances aren't great though and there's a CRAZY vent, you can kinda see it in the second picture above the stove-top. It leads directly outside and sounds like a jet plane... not my favorite thing.) We aren't going to be able to do any "real" renovating on the kitchen for about 5-10 years, but that's ok because I get to cook in it and get a feel for it. 2) About two weeks ago, I started the massive project of sanding, priming, and painting all my laminate cabinets. (Pictures... erm, soon?) 3) more plastic tile, this time yellow and black. Yellow is my favorite color, and I kinda liked the yellow and black, but it doesn't go with my color scheme for the house, so I'm trying to figure out what to do... 4) Double stainless steal sink I heart you! (When I post pictures of the apartment's kitchen, you'll know why)


The Basement
Notes: 1) Only two lights downstairs are currently working, so I can't show you everything... There's lots more. Behind the wood paneling there is a laundry room and a work room. Behind the beads (oh yes, beads!) There is a big empty space that will be my ART STUDIO!!! (I could pee my pants I'm so excited!) 2) The 70's called and they want their basement back! lol, I love me some 70's style, but this is a bit too authentic for my tastes. 3) There's a second full bathroom, but..
.
it's gross... it's better now, we've worked on it since these pics were taken, but it's still gross! It's a man bathroom, which is appropriate since I'm gonna let Justin turn his half of the basement into a man den/ family room. This will be the boys bathroom. It's a COLD place to shower in the winter!

OK, Back Up Stairs!

There are three bed rooms...

Bedroom 1: The smallest, will be the nursery for future babies, but is currently our storage room.


Bedroom 2: Middle sized, currently the guest bedroom

Bedroom 3: (which apparently, I did not take a good picture of) The master bedroom. This blue is called "Charted Voyage" and both Justin and I love it.

That's basically everything... I tried to keep the tour cohesive, but somehow I forgot pictures of the sun room, so here it is.

We are going to make it into a game/play room for us and for said future babies.

WOO! that took much longer than I thought it would, but now all the befores are up, so I can start showing you some progress pictures... not tonight... I'll do that once I've recovered from this post, lol. (Oh and if you're thinking "she must be crazy" don't worry, you're right :) I most definitely am!)